Tuesday, July 12, 2022

Energy Monitoring


I was warned by the installer that my choice of system size might not perfectly offset my usage. I decided to take that as a challenge to reduce my energy usage instead of increasing the size of my solar system. So far I have had two power bills that reflected a full month of solar usage, with an average of $20 due. To address this I have decided look into more closely metering individual devices to better understand my energy usage. 

I know there are several options that could be used to get this data into home assistant. Luckily someone already did a great job of summarizing these options, XtremeOwnage investigated each of the options here. Based on that article I decided to go with the Emporia Vue 2 flashed with ESPHome as described here

Using the documentation flaviut published was pretty straight forward. The first major issues I ran into was with the initial flashing of ESPHome. This was my first attempt at using ESPHome with my Home Assistant ecosystem. I installed ESPHome as an add on to my install of Home Assistant, but due to compilation issues I was unable to use the add on to flash the device. I ended up using my desktop to flash the device, which allowed me to move forward.  

The hardware installation was very straight forward and only took about 45 minutes. I ended up having to reverse the collar on the antenna since my breaker box is flush with the wall in the garage. Luckily my breaker box was just updated when I had my solar installed, so there was ample room for the device and additional wiring for all 18 CT clamps. One of two issues I had was installing the CT clamps for my solar circuit backwards since they all indicate the proper direction as towards breaker, while the solar circuits should be away from the breaker, luckily that could be resolved in software.

Another issue I had was because I was unlucky in my choice of phase to monitor for my dryer. Apparently the motor for the dryer drum is only 120, not  240. The phase I chose monitor is only used for the heating element so I will either have to be clever in any automation I setup to detect when the dryer is done or I will need to adjust which phase has the clamp. 

When I tried to update the initial configuration with ESPHome I learned that the yaml file was actually used as a source file when compiling the program for ESPHome so I still couldn't used the Home Assistant add on to update it. I then installed the ESPHome docker image on my unraid system. One additional change I had to make for the docker install of ESPHome to recognize the Vue was set a static IP on the device. Once that was specified the device was found I was able to remotely update it. 
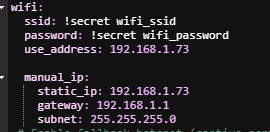

For a basic installation the only required changes to the base yaml file needed are specifying which phase each input and their multiplier for tracking 240V devices on a single sensor.  Because I have solar power, I had to add some additional sensors to have the correct info exposed for the home energy dashboard. I needed breakout the total power to separately expose data on when energy was being imported and exported. While the total_daily_energy sensor accurately tracks the net usage, Home Assistant does not play well with power sensors that decrease in KWH or report negative values. The below code adds the needed sensor data to home assistant to properly use the energy dashboard.


Now that I have all this info available in home assistant I can take a deeper look into what devices my power is really going too. My AC unit is taking the majority of my power this week. Being a 10 SEER unit I will have to seriously consider upgrading to a modern more energy efficient unit once I have more funds available. 


Friday, July 8, 2022

Resolving Errors

 For the past several months I have been dealing with issues updated Home Assistant OS. Anytime I tried to upgrade from 7.2 my HUSBZB-1 stick stopped showing up as an option for the zwave and zigbee integrations. Other users reported similar issues with version 7.3 so I waited for 7.4. Once 7.4 was confirmed by other users to correct the issue I tried to upgrade. 

 When I initially upgraded to 7.4 the issue persisted so I though the other uses might have been mistaken about it being resolved. I worked through downgrading the OS to 7.2 and waited for a future update to resolve it. Then I forgot all about the issue until upgrading a few weeks later. In my haste to install  a core update I also updated the OS. This lead to my post about disaster recovery

This week I finally circled back to this issue since Home Assistant somehow seemed to start automatically running the update over and over again forcing the system to OS 7.6. This completly crippled my smart home. This lead me to searching the old threads on forums where other users had similar issues with OS 7.3  and thinking I needed to upgrade my HUSBZB-1 stick to the latest firmware as recommended here. I was ultimately successful in updating the firmware, but my issues persisted. 

At this point I was left thinking either I needed to start from scratch  or a new zwave/zigbee stick. I decided to start checking all reasonable solutions before paying for some new hardware, so I flashed another small SSD I had in my spare parts bin with the latest image for installing Home Assistant OS 8.0. At this point I chose to initialize the new instance of Home Assistant and try to configure the stick with a single zwave outlet and a single zigbee switch  to confirm if starting from scratch was a possible solution. 

This attempt failed also; the stick was still not showing up as expected. Additionally the fresh install was not reporting the expected 8.0 OS version, it was still reporting 7.6.  This lead me to look at the Raspberry Pi hardware as that was one of two constants in all these issues. I realized I still had the micro-sd card inserted, which had the PI image that is supposed to be used to switch the PI to booting for USB instead of micro-sd. I am still not sure how this was causing the issue, but after removing the micro-sd card and switching back to my original SSD the updates completed successfully to 7.6 with the stick working. This allowed me to finally get completely up to date. 

Wednesday, July 6, 2022

Open EVSE

 After over three and half years making due with a level 1 charger for my car I have decided to upgrade to a proper level 2 charger. I chose to install an Open EVSE charger as it allows local control and can integrate with Home Assistant nicely by way of  a HACS integration. 


This charger allows me to see detect when the vehicle was plugged in and issue a command to turn off the charging before the car has communicated that a charging session needs to start.  Additionally it allows Home Assistant to send commands to set the max charge amperage. This data allows me to setup automations to automatically recharge quickly after allowing the battery time to cool if I have come back from lunch or  to schedule slow charging overnight. 

This charger also exposes the energy usage data. While my old solution of the factory level 1 charger with a smart outlet also exposed this data, it is important to note that functionality was not lost in this upgrade. I would hate to take two steps forward just to take one step back when upgrading smart home equipment. 

While my car is only a plug-in hybrid that tops out at about 14 AMPs, the charger was installed with wiring, outlet, and breaker rated for 60 AMPs. This will allow the Open EVSE to be used for several years and remain useful if I upgrade to a full EV in the future. Additionally this installation added a much needed 240v outlet in my garage that can be used for other things such as powering a welder or providing power for a trailer if the need ever arises.

Sunday, July 3, 2022

MQTT

Some of the device I have integrated into my smart home use MQTT to communicate to Home Assistant. Since MQTT is a widely used protocol, utilities exist for most existing systems.  While I still don't understand completely the underlying protocol of MQTT, it seemed like the best route to setup a custom sensor to get feedback from a script on my Linux system for ripping backups of discs. 

I simply had to mosquitto_pub entries to the the existing shell script that automates the process in order to know the status of process.  Since I only really care to know when I need to get up to swap a fresh disc into the system I simply report 1 when the tray is open and 0 when the ripping is in progress.


On the Home Assistant side it was simple to add a binary sensor to subscribe to the topic and messages I specified in the shell script. This allowed me add an automation to flash my WLED bias lighting on my desk with a specific color scheme for a minute to let me know it has completed.


Additionally I decided to try something new by using this to add tracking data for this process in Home Assistant. To track the number of discs ripped I added  a counter helper to store the data.  The automation that I created for the notification light was adjusted to call the counter increment function to track the number of discs I have ripped. I will be manually setting the current count to reflect discs that were ripped before this was integrated. 


While I normally like to link back to the appropriate project when talking about projects, I have chosen not to do so here due to legal implications of specifying the content of the discs being ripped. I will simply say the software doing the ripping is widely considered the go to solution and is free but not open source. The script for automating the ripping is separate but also easily findable. 

Update:
After clearing the backlog of discs I had sitting around I realized that I could also make use of this MQTT data to intelligently save power when I am not actively ripping discs. I have configured the automated script to run as a service on startup (which required a small re-write of the ripping automation script to avoid using paths based on executing user) and configured the BIOS to power on when power is restored. With those settings and by adding a smart plug I was able to create an automation so that if the tray is open for 1 hour the power is cut. Then when I want to resume ripping discs I just have to turn the smart plug back on with either a voice command, through Home Assistant, or by directly hitting the physical button. 

Monday, May 23, 2022

NFC Tags

 I have reached a point in my smart home automations where it seems like I need to start adding buttons to trigger actions. Doing that would add another class of device that needs routine maintenance for batteries. The preferred solution that avoids batteries seems to using NFC tags. This approach has the added benefit of being much cheaper with the only apparent drawback being the tags seeming out of place in some installation locations. 

Home Assistant makes NFC tags very easy to use by including in the companion app both a reader and writer.  This allows you to purchase relatively inexpensive sticker tags that can be installed anywhere. These are the ones I ended up using tags , 28 stickers for a little under 14 dollars after tax.

I have added tags to trigger automations for obvious things like a bedtime routine, hue lights,  and outlet controls.  Additionally a couple more complex uses such as having a tag on my cars charging port cover that when scanned scheduled the car charger to start in 30 minutes giving the battery time to cool down  but still allowing me to have a full charge for a second trip later in the day. Also one has been setup to be scanned post shower; this schedules the bathroom fan and lights to turn off a few minutes later and handles disconnecting my phone from the Bluetooth speaker integrated into the vent fan allowing me continue playback of whatever I was listening too while the vent is still on. 

I am sure I will find some additional uses for these tags as I still have several left. I know some people have used these tags to track events instead of triggering actions. My next use for them might be to set basic alarms for things I routinely cook that rely on consistent timers.

Friday, May 20, 2022

Smart Window Blinds

  Since I purchased my home I have had black out curtains on all my windows so that I would have complete control over my lighting.  As part of my quest to lower my power consumption to match what my solar panels are producing I have started to reconsider the use of natural light. The obvious choice here is to add blinds/curtains/shades that I can control with my smart home. 

I chose to start by replacing the blackout curtains and blinds in my office with a FYRTUR smart blind from Ikea. This has proven to be an ok solution for a room that total darkness isn't needed in, but does not effectively block enough light for a bedroom. I will be looking into other solutions before replacing my bedroom curtains.

These blind support the ZigBee protocol, so adding them as a window cover in Home Assistant was very straight forward. The only issue I had was with adding the included remote to Home Assistant. I attempted to us the blueprint for the specific remote IKEA E1743 TRÅDFRI.  The issue is that IKEA uses the same model number for the remote but with different button labels and trigger actions delivered in the payload. I was able to create the necessary automations using that blueprint then manually edit the yaml to correct the string matching for the special remote included with the blinds. 


I have added automations to open the blinds as soon as my motion sensors detect I have started my day, close after sunset, and ensure they are closed when I leave my home zone.  

Saturday, May 7, 2022

3D Modeling

 I have been a fan of 3D printing for years. I bought a Makerbot Mini back in 2016 and upgraded to a CR10s in 2020. In all this time I have only ever printed interesting and useful things others have modeled/created. Occasionally I have added or removed a little bit of a model optimize it for my need, but I had never created anything entirely from scratch.  I just now finally found an issue that I could not find an existing model for. 


My Shark Smart vacuum that I have been using for years has a small issue of the power button being at the exact high as my door stops. This was never a problem before due to the pathing the vacuum would take from its dock. I recently relocated its dock as my new puppy seems to be obsessed with barking at it, and the only other reasonable location happens to set the vacuum on a direct path for this issue to happen almost every time. Other users have complained about the issue and have resulted in taping over it, but a plastic cover seems like a more elegant solution. 


As this is my first time modeling something I knew it might take a few revisions to get to a point that I am happy with. The first was too tight to fit in place. The second was too tall. The third was just right on one side. Rather than trying to properly curve the outer surface I decided to just tilt the cap to make sure neither side extended past the existing body. This was done to avoid scaring the baseboards; as the below photo shows the existing body already makes enough contact to transfer paint.


The forth revision printed with an angled fitted wonderfully. Printed in the only color of PETG I have available on hand. Now only time will tell if this stays in place after multiple cleaning sessions. The cover fits in place well enough that in order to remove it, I had to stick tape to it. Hopefully the tolerances are tight enough to make that a permanent solution. Either way this will allow me to get my vacuum back into the automation to run any time I leave the house. 

Thingiverse Model link incase anyone else want to print it. https://www.thingiverse.com/thing:5379770 

Monday, April 11, 2022

Sun Powered

In an effort to be more environmentally friendly I have gone thought the long process of having solar panels installed on my room. The process took over 3 months from initial quote to finally producing power. My system is comprised of 18  385W panels and a 6KW Solar Edge Inverter. These panels should be enough to offset my entire usage if I stop mining crypto and work out some energy saving automations to ensure I don't waste any watts.

Additionally my grid connection had to be upgraded to 200 KW service and in a effort to avoid future maintenance complications my roof was replaced with a standing seem metal roof ahead of the panel installations. This added power availability should allow me to hook up a future proof EV charger so that I can  make better use of my plugin hybrid by recharging during the day when needed rather than relying on a level 1 charger I currently use. 


This ties into the gimmick of smart home things based on the fact that the inverter reports data to the cloud. Home Assistants energy dashboard consumes this data to allow me to track total production and real time current. I was very disappointed to learn that my inverter was not also reporting net production like the API documentation indicated might be available. That added data can be accessed if I install some add on accessory to monitor the back feed to the grid or I can add on a full monitoring solution to track my individual circuits as well as the grid connection. Once I have that full data available I should be able to control my car charging to insure it really is powered by the sun.


Wednesday, April 6, 2022

Planning for failure

 This week the new Home Assistant Core 2022.4.0 was released. As with all updated I was eager to update my system after reading the release notes to make sure there was no breaking changes I care about. Additionally I took the opportunity to update the OS to 7.6 from 7.2. That is where the problems started.

Once the updates were complete I noticed an issue, Zigbee and Zwave communication was not working. At this point I realized the most recent full backup I had was from just under a week ago. Normally that wouldn't be a problem, but in the last week I had updated camera configurations, scripts, automations, and added new hardware since the last backup. 

Once I noticed this issue I tried to fix forward by touching the Zwave config that was claiming to be broken  then when that failed I restored from the partial backup automatically created when the Core version was updated. This didn't help. Then I paused and decided I should probably create a back up in the bad state since at least it had my script/automation/device changes. If I failed in restoring at least I could get back to the current status.

I then restored to the last full backup hoping that at least I could regain control of my lights. The restore process worked, but the issue persisted. This left me very confused for a few minutes until I realized that the OS level hadn't changed. Apparently Home Assistant does not consider OS level part of a "full" backup. Luckily they do allow downgrading OS via a simple terminal command, so I was able to downgrade the OS to 7.2 and reboot. At this point my Zigbee/Zwave integrations were working again. 


The next step was to go through the restore process once more, but this time using the backup I had just created after recognizing there was a problem. Luckily Home Assistant allows you to complete a partial restore from a full backup, so I was able to restore everything accept the Zwave configuration that I had attempted to correct manually. 


I know people say not to plan for failure, but in tech you really do need to have appropriate plans in place or you might end up not being able to turn your light off/on. This experience has inspired me to be more patient when it comes to applying updates and to ensure that a backup is done anytime a significant change is done.  

Thanks to this nifty add-on (https://community.home-assistant.io/t/add-on-home-assistant-google-drive-backup/107928) I have automated backups that are stored in my google cloud account on a regular cadence. But that doesn't protect me from making foolish mistakes like I did in this post. If anything, I previously had more caution around changes/updates when I knew the only backups available were ones I manually created. 


Friday, December 31, 2021

You've Got Mail

I decided I wanted add a sensor to know when my mail has arrived. Searching online showed that this wasn't an original idea. Most people run into trouble having a sensor for this due signal loss to either all metal mail boxes or distance. Before I bought a new sensor I chose to test these limitation by temporarily relocating a motion sensor to the back of my mailbox.  Luckily I didn't run into either of those issues since I already had Zigbee bulbs for some exterior lighting with a relatively short drive way and a plastic mailbox. 

I ordered an new THIRDREALITY Motion Sensor  since that exact sensor was used to test this concept.  To make the sensor less noticeable I removed the electronics and gave it a quick coat of spray paint to make it blend in with the back of the mailbox. 

To ensure I only receive a single notification I have the automation disable itself as its last action. 


 Separately I have an automation set to also trigger off of movement in the mailbox but only run it's actions if the "Motion Mailbox Mail Arrived" automation is disabled. All this automation does is re-enable the "Motion Mailbox Mail Arrived" automation.


Additionally  I have added re-enabling the "Motion Mailbox Mail Arrived" automation. This is due to the fact that I don't always care to retrieve my mail since I normally know what is being delivered. Informed delivery sends me an email each morning with a scan of my mail. https://informeddelivery.usps.com/ is worth checking out if you haven't heard of it before. 

The only thing left to do is monitor how well the sensor actually works now that it has been deployed. 

Thursday, November 25, 2021

Security Camera Setup

 I have had a security camera system in place for over 4 years, but I have never fully utilized it. My current 8 camera system is an integrated system by ZMODO. While it had good performance when first installed the image quality in a couple of the cameras has dropped off significantly in the last couple years.


Unfortunately the existing cameras are not compatible with anything other than the ZMODO base station that came in the original set. So I can't test new software solutions with the old hardware.  The other factor driving this update is the fact that ZMODO doesn't integrate with Home Assistant. It doesn't allow for imbedding image feeds or feeding motion alerts/object detection into automations.

To start this project I replaced the main camera that overlooks my front door. Luckily the cables run for the old cameras are power over ethernet cables that can be adapted for use with standard cameras by just clipping off the proprietary connector and installing a RJ45 connector.  So I have installed a generic 1080P RTSP camera using the old cable. 


Zone Minder, Frigate, and Blue Iris were all tested before I finally decided to use Blue Iris. This was selected due to the ease of setup and integration with Home Assistant via the Home Assistant Community Store (HACS).  This update required 3 software components be setup: Blue Iris, an MQTT server, and the Home Assistant Integration. 

I chose to make use of the convenient Unraid Community Applications store add on for Blue Iris that only requires selecting the data storage location to setup the docker image. Once the Blue Iris docker instance booted setup was very straight forward. The camera is added using the  RTSP url/port/credentials that are unique based on the specific camera. Additionally a user account needs to be setup to allow access via Home Assistant.


Adding the Home Assistant integration is as simple as adding it using HAC. All that needed to be set was the IP address, port, username, and password of the account setup in Blue Iris. 


At this point the camera is exposed to Home Assistant and the entities for motion alerts and connectivity.  The next task is actually feeding the motion sensors with data. To do this an MQTT server has to be setup. I chose to setup the MQTT server available in the official Home Assistant add on store. The tricky thing here is both the Add-On and the integration it adds has to be configured. The configuration is very straight forward to just set a username and password for the MQTT broker. 

The last step is configuring Blue Iris to feed the MQTT server the data. This is done by adjusting the server level configuration under Digital IO and IOT.  The MQTT server credentials need to be set and tested to ensure the MQTT sever is properly connected. 


At this point I added a new Camera page to my dashboard to add the new camera and sensor.  I was also able to create a basic motion activated alert to my phone. The final step of this setup is the same as all new Home Assistant changes, create a backup and securely store it on another system.

I will continue to monitor how this performs over the next week before I purchase a license for Blue Iris. So far it seems like it will be well worth the $60 license fee. If they happen to have a Black Friday sale I might make that decision sooner. I will be monitoring Black Friday and Cyber Monday sales for new camera to replace the remaining ZMODO cameras.

Smart Home Switches for Older Homes: A Neutral-less Journey 🏠💡

For many of us living in older homes, the dream of a seamless smart home can quickly become a frustrating reality. A common hurdle? The lack...